EXTINCTION : My Approach to a Self Portrait
I have an approach to painting which I have used with my high school students with strong success and I will explain some of the key points associated with this method by presenting my self-portrait titled Extinction, oil on canvas. It received Best of Show at the 44th annual Art Center exhibit in Corpus Christi, Texas.


GETTING STARTED: Sketching and Getting Canvas Ready
To begin, I use vine charcoal to sketch and shade the figure(s) in my compositions. Using vine charcoal has many advantages. Unlike a graphite pencil, the vine charcoal has very little, if any, harmful effects on your pigments. Graphite pencils will greatly affect your canvas and pigments and erasing graphite is usually messy and the residue left will still have altering effects on the pigments.
Vine charcoal is also different from black charcoal pastels. The black charcoal pastel is generally used as a permanent medium because of its density and permanence. Vine charcoal can be ‘brushed-off’ with a brush or rag and a faint ‘ghost-like’ image is left after brushing off the vine charcoal.
After my students drew and rendered their subject for their composition. They were instructed to erase the canvas with their very special eraser, their hand. Yes their hand. Using their bare hand, they would smear the canvas with a faint shade of charcoal. This process was referred to ‘killing the white canvas’.
Killing the White
‘Killing the white’ is a vital step in an ability for one to distinguish the subtle differences in hues.
I explained to the students that the human eye will have difficulty ‘seeing’ the true hue because of the massive amount of white primer associated with their white canvas. So by smearing the vine charcoal dust throughout the surface of their white canvas, they turned the canvas a dull grey.
This inability of the eye to clearly see the hue was explained by reminding them that many of us have difficulty driving at night. Sometimes the headlights of oncoming vehicles create a glare (simulates too much white on a canvas) and we have a difficult time seeing details and hues. If the vehicle has their bright lights on then the ability to see the color is extremely challenging if not impossible. This could happen when we paint outdoors and the sun’s light is now bouncing off the white canvas much like a vehicle with bright lights.
A better approach used by many painters is to dull the white canvas before painting. They ‘kill the white’. The artist may create a wash consisting of dirty colors of browns, blues, greys, if they are using acrylic paints. If they are using oil paints they may use a grey-like hue or a sienna hue thinned with Linseed oil, and applied in a very thin manner similar to a wash. The main purpose is to reduce the amount of glaring white by using a neutral hue.
Using vine charcoal would give the students the ability to neutralize the white quickly and efficiently without using a painting pigment.
If you begin with a paint application then allow the paint to dry before you proceed. If you begin with vine charcoal you will be ready to begin underpainting.
UNDER-PAINTING: Image one

After the students complete the vine charcoal application and ‘kill the white’, we begin to paint.
This first image shows my first application of pigment. I generally use sienna and linseed oil. My approach is to gently apply (very important) thin layers of sienna. This is referred as under-painting.
I consider under-painting to be a very important step in my painting style. I will use two stages of under-painting in my work. The first stage is created with sienna and linseed oil to create rendering to match the shadows and hues established with the vine charcoal. Next I will use greys to model the form. Whites are used to identify reflected light or highlights.
If the students apply and build the values illustrating form then they will likely apply the actual pigments in the same manner. The pigments will likely be applied in varying tones to help establish form.
In the first image you may notice that some of the charcoal is more visible e.g. mustache, hair, and a few other areas. This was done by applying Linseed oil onto the vine charcoal. Greater density of sienna are visible in the shadows created by the arms, chin, and pecs. This was done because this will be an important part of the composition and I want to establish a quick feeling of volume, weight, and form.
Quick Tip #1
Start with a good quality brush, I like to use filbert brushes. They are not round and they are not square. They are a combination of the two. But use what you are most comfortable with. All brushes are good and can be troublesome if you are not familiar with the tools of the trade. I will give some advice on how to use your brush in tip #3.
Quick Tip #2
Use a plate of glass as your mixing tray. A glass surface is easy to clean with a straight safety blade even if the paint is dried. The blade will leave a very clean surface. consider investing on a plate of glass sometimes referred to as ‘safety-glass’ or tempered glass. If this glass falls or is hit with some force, the glass will break into small cube-like squares or not break.
Paint the underside of the glass grey. Again, this will allow your eyes and your brain to ‘better see’ the hues.
If you use a regular glass, add some protection. Use painter’s tape on the underneath side and cover the entire surface next apply the tape to the edges of the glass plate. This will help hold the glass together to control dangerous breakage and the tape along the edge may help prevent cutting yourself when handling the edge.
Quick Tip #3
Brushes. # 8 or # 10 brushes are ideal for this first stage. These brushes are about as wide as a person’s thumb nail ( ¾ of an inch – so –so wide). The size will allow you to cover the area quickly and not focus on small details.
Don’t scoop the paint from the glass tray. A little bit of paint can go a long way, and at this stage you want your layers to be thin, and somewhat transparent. If you scoop the paint you likely have too much paint and you will likely not have good control of the brush and the paint.
Instead of scooping the paint, ‘press’ the ‘toe’ portion of the brush onto the paint. Do this several time to embed the paint into the fibers of the brush. I refer to this step as ‘loading’ the brush. Flip the brush so that the top of the brush fibers are now the bottom side and ‘load’ the fibers on the opposite side of the brush. Try not to load the bristles with paint all the way up to the heel. Cover the toes of the brush and don’t go pass the mid belly. This will give you control. Having control is critical.
You are now ready to under-paint.
Be free with the application of sienna. Use a drop of Linseed oil or turpentine to thin the pigment to a wash level. Don’t worry about brush strokes. Don’t worry about edges. Don’t think of this stage as the final stage. This is the rough stage. This is much like building a house. You do not install the carpet, window coverings etc when the house is just in the frame stage.
You are building a painting. There are many stages. At this stage you want to generalize the composition. Examine the structure of your composition and your design. Is there a balance between the negative space and the subject. Can you see where the focal points will be?
In this composition, I want three areas of interest with one being more important than the other two. I want a message of movement, and a sense of unity. I am ready for the next stage.
If you wish, you can allow this stage to dry or if you feel confident begin the second stage.
Quick Tip # 4
One concern many people have with using oils is the slow drying of the medium. The use of Liquin can help speed the drying time. Don’t overuse the amount of Liquin in your pigments.
My students used a simple rule of measurement when using Liquin: paint is equal to the length of toothpaste on a toothbrush and the amount of Liquin to this amount of paint is equal to the amount of Liquin that might be needed to paint a thumbnail. Use a small pallet knife to properly mix the two products together. Avoid using a brush for mixing. Using a brush will likely not mix the products evenly and then, what are you going to do with all that paint in the brush?
Image two: Under-painting the first hues
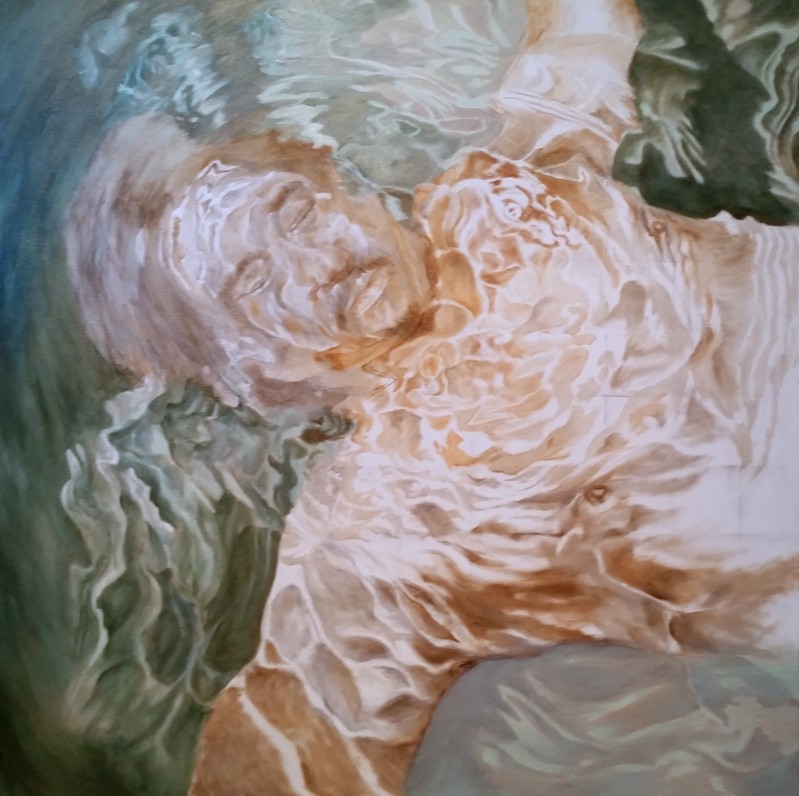
Every hue selected in creating the figure will be reflected onto the water and every hue that makes up the water is reflected on the figure.
This effect is easily noted at sunset. The sun’s warm hues of reds, orange, and yellow are reflected on buildings, people, virtually every object.
Quick Tip # 5
Stand before a mirror. Hold a sheet of colored paper, say- red card stock, below your neck as if you were trying to catch confetti falling from your head. If you look at yourself you will notice that the red is reflecting onto your face, hair and clothing. Change the red sheet of paper to a different, say, blue. Now you appear a shade of blue. Now try a white sheet of paper. What did you notice? You should see that shadows below your nose or your lower lip appear lighter. The shadows are diminished or missing altogether.
Light reflecting in water will send this reflection to objectives in the water. Hues of the subject are also reflected in the water.
Hues used in this composition must be incorporated throughout the composition. The hue may be lighter or altered by mixing it with other hues but the hue is still present. This is why we may have yellow, or yellow orange, orange red, a light yellow orange, a dull yellow orange or any other mixture.